Configuring and running Appium tests on Android devices in Android Studio
Every developer knows that however daunting it might be, testing is a crucial part of building and deploying software. Mobile apps are not in the very least an exception to this rule due to the immense number of devices and operating systems configurations they have to support. Thankfully, there are many tools facilitating the testing process and one of them, Appium, is the main concern of the article.
What is Appium and why should I care?
Appium is an open source automation tool for testing native applications, mobile-web applications and hybrid applications on Android or iOS utilizing Selenium Webdriver technology. Anticipating your questions — Selenium is a popular web applications testing automation framework.
Appium allows you to use your favorite programming language to write automatic instrumentation tests for your mobile applications (and websites but this is outside of the scope of this article). There is cross-platform support, meaning that you can easily write UI tests for both Android and iOS devices for example. Moreover, you can run your tests on many devices simultaneously.
How does Appium work?
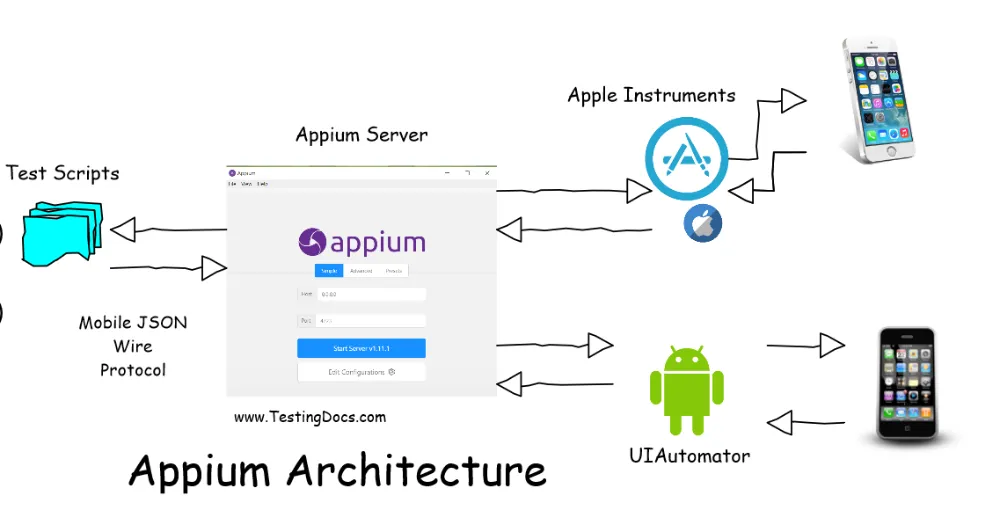
Essentially, Appium is just an HTTP server running on Node.js which exposes a REST API and implements Selenium WebDriver. When Appium receives a connection request from the client, it then listens for commands which upon receiving are translated to device-specific commands, sent and executed. Responses from the test devices are forwarded back to the client.
How to install and configure Appium for usage in Android Studio
- Install Appium dependencies
Appium requires Node.js and Node Package Manager to be installed beforehand. If you have them already installed, it is best to update them to the latest stable version.
- Install Appium via NPM
Ensure that NPM is installed correctly for command line usage and simply run npm install -g appium .
- Set up Android Studio
Ensure that Android Studio with all its dependencies are installed correctly, with special attention to Java SDK and Android SDK setup. Also verify that ADB is running correctly and that your test device is recognized. Developer Options and USB debugging must be enabled on the device. You might need to restart ADB. For more detailed help visit the official guide at https://developer.android.com/studio/command-line/adb.
- Add environment variables
Appium requires 2 environment variables to be set up in your operating system. Namely:
ANDROID_HOME environmental variable must be added and set to the location of the Android SDK on your workstation.
JAVA_HOME environmental variable must be added and set to the location of the Java SDK.
Normally, the 2 tools mentioned above are installed with Android Studio and are situated in standardized locations. You can easily Google search the location depending on your operating system and Android Studio installation.
- Verify Appium install
After all the steps above, Appium should be ready to launch with a simple command appium in the command line. Should you encounter any problems, there is a tool for that — “appium-doctor” which verifies all the Appium dependencies. For more information see https://github.com/appium/appium-doctor.
For more detailed Appium installation instructions see https://appium.io/docs/en/about-appium/getting-started/?lang=en.
- Set up Android Studio tests
For running Appium tests I recommend using the TestNG testing library. It is important NOT to use the Android Studio Instrumentation Tests default configuration. TestNG is supported out-of-the-box by Android Studio as well. You just need to add it to the list of dependencies in Gradle or any other dependency management tool you’re using. Grab the latest version from the Maven repository https://mvnrepository.com/artifact/org.testng/testng. Other significant dependencies you are going to need are as follow:
Appium Java client — https://mvnrepository.com/artifact/io.appium/java-client
Selenium Java — https://mvnrepository.com/artifact/org.seleniumhq.selenium/selenium-java/4.4.0
- Create your first test
Create a new subpackage for Appium tests, naming it whatever you like and create a new file within it and paste the following Kotlin code, adding the relevant package xxx.xxx.xxx directive at the top. This is a skeleton for running Appium tests. If you wish to use Java, it should be simple enough to translate this code into Java, either manually or using conversion tools.
import io.appium.java_client.android.AndroidDriver
import kotlinx.coroutines.delay
import kotlinx.coroutines.runBlocking
import org.testng.annotations.BeforeTest
import org.openqa.selenium.remote.DesiredCapabilities
import org.testng.annotations.AfterTest
import org.testng.annotations.Test
import java.net.URL

const val ADB_DEVICE_UID = "adb_device_uid"
const val APP_PACKAGE = "xxx.app.package"
const val ACTIVITY = "main.app.activity"
const val PATH_TO_APK = "path/to/your/apk.apk"
const val APPIUM_SERVER_URL = "http://127.0.0.1:4723/wd/hub"

class AppiumTest {
    private lateinit var driver: AndroidDriver = null

    @BeforeTest
    fun setUp() {
        val desiredCapabilities = DesiredCapabilities()
        desiredCapabilities.setCapability("platformName", "Android")
        desiredCapabilities.setCapability("appium:automationName", "UiAutomator2")
        desiredCapabilities.setCapability("appium:deviceName", ADB_DEVICE_UID)
        desiredCapabilities.setCapability(MobileCapabilityType.UDID, ADB_DEVICE_UID)
        desiredCapabilities.setCapability("appium:appPackage", APP_PACKAGE)
        desiredCapabilities.setCapability("appium:appActivity", ACTIVITY)
        desiredCapabilities.setCapability("appium:app", PATH_TO_APK)
        desiredCapabilities.setCapability("appium:newCommandTimeout", 60)
        desiredCapabilities.setCapability("uiautomator2ServerInstallTimeout", 60000)
        desiredCapabilities.setCapability("adbExecTimeout", 30000)
        val remoteUrl = URL(APPIUM_SERVER_URL)
        driver = AndroidDriver(remoteUrl, desiredCapabilities)
        driver.setSetting(Setting.WAIT_FOR_IDLE_TIMEOUT, 100)
    }

    @Test
    fun sampleTest() {
        driver.findElement(By.id("element_id"))
    }

    @AfterTest
    fun tearDown() {
        driver.quit()
    }
}
Obviously, you need to change the constants at the top to match your case.
ADB_DEVICE_UID — the ID of your device connected to Android Debug Bridge. This can be checked using adb devices command.
APP_PACKAGE — the package name of your Android app — for example com.example.application
ACTIVITY — the app Activity that you wish to perform tests on — you can simply copy the main activity name from your AndroidMainfest.xml . For example .MainActivity
PATH_TO_APK — path to the .apk file on your workstation that is built by Android Studio. I recommend to manually execute the following steps in Android Studio:
- Top-bar menu -> Build -> Clean Project
- Build -> Rebuild Project
After these steps (each of them takes a while, have patience) your APK should be present in your project files under app/build/outputs/apk/debug/app-debug.apk. (The location might differ due to custom project configurations, Android Studio version and more.) Right-click the file and copy the absolute path to it and paste it. Note that in order to localize it you may have to change the project structure view to “Project”. It might not be visible in the default “Android” view.
APPIUM_SERVER_URL — this is the only constant that you should probably leave as is. If you change Appium configuration to utilize a different port, different API endpoints, or run it on a remote machine with a different IP address then you will need to tune it.
“element_id” — replace it with the layout xml id of any element that is displayed on the tested activity. Of course the capabilities of Appium go way beyond mere verification of an element being present, this is just a basic demonstration.
- Configuring TestNg
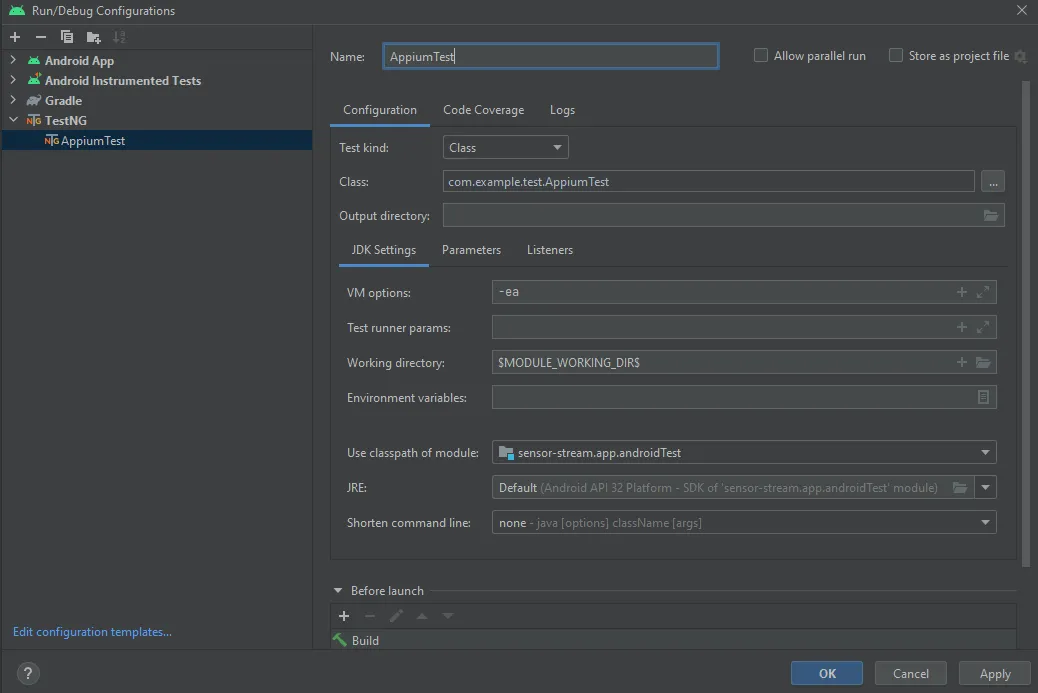
One of the last steps is to point Android Studio to your newly created TestNg test class. Select the “Select Run/Debug Configuration” list, then click on “Edit Configurations”. Click the “+” button and select TestNg from the list. Set “Test kind” to “Class” and choose the AppiumTest class file you created in the previous steps. In “Use classpath of module” choose the package within which your test class resides. The rest should be left as default. For reference:
- Run your test!
Ensure that Appium is running in the terminal. If not, launch it with the appium command. In Android Studio, choose your TestNg run configuration and press the Green Play button. Ensure that the target test device is unlocked. Wait for Appium to do its magic and launch the test on your device automatically…
- Troubleshooting
In case of any problems, read the test output, logcat messages and Appium server logs that are displayed in the terminal by default. It might be required to use the infamous “Invalidate caches and restart” option in Android Studio. Follow troubleshooting guides at https://appium.io/docs/en/writing-running-appium/other/troubleshooting/. A good option to try as well is to download the Appium desktop GUI app and seperately, Appium Inspector. These two tools enable you to configure and launch Appium tests without writing code.
- What next?
For writing more sophisticated and interactive instrumentation tests that perform things like clicking on buttons, swiping, double-tapping, etc. the official Appium Java client documentation is the most reliable and obvious source of knowledge — https://javadoc.io/doc/io.appium/java-client/latest/index.html. For more digestible reference, there are some cheatsheets available online, like this one: https://www.automatetheplanet.com/most-complete-appium-kotlin-cheat-sheet/.
Thank you for bearing with me till the end of this article. I plan to write a follow-up tutorial on setting up Appium tests on a remote battery of devices, so follow me if you would like to see it!